Perfect Sourdough Pizza
Pizza without the Pizza Oven
This is my recipe for sourdough pizza. We'll start by culturing a starter, that we'll later incorporate into a sourdough. We'll prepare a seasoned sauce. Finally, I'll share the foolproof method I use for cooking the pizza, using nothing more than a hob, frying pan, and grill.

It does involve steps over multiple days, and if you haven't already got a sourdough culture: it can take anywhere from days to weeks to grow one.
🔢 Recipe Makes
⚖️ Preferred Units
Leaven
The leaven is the living, breathing mixture, containing primarily two groups of microorganisms: Lactobacilli, and yeasts. Both metabolise the carbohydrates provided in the flour and work to produce CO2, giving our pizza its rise. The Lactobacilli are responsible for giving the dough its characteristic sourness - in the form of lactic acid. Both these groups are found abundantly in the environment, and therefore we don't have to innoculate our starter - as they'll naturally colonise our mixture of their own accord.
You will need to find a suitable vessel to house your sourdough colony. It should be:
- large enough for the leaven to expand multiple times in size
- has some means of pressure release - making sure the container isn't going to assume the role of an IED if the yeasts get a bit carried away
- covered to prevent fruit flies or other creatures being enticed by the fermenting mixture
Specific fermentation jars exist, but are not required by any means.
🥣 Leaven
- 300 g Strong Flour
- 300 ml Water
- 100 g Strong Flour
- 100 ml Water
to start
to refresh
- Mix the 300 g flour, and 300 ml water in your container
- Now leave your mixture for 12 h
- Refresh your starter by tipping away (yes) about ¾ of the mixture, and add more 100 g flour, and 100 ml water.
- Repeat this every 12 h until the mixture starts to bubble, expand, and develops a characteristic sour smell.
As your starter grows, you may want to adjust the amounts of 100 g flour, and 100 ml water, to arrive at the final 360 g + enough to replenish. This is fine, as long as you maintain the 1:1 weight:weight ratio.
You should end up with a viscous mixture, full of bubbles.
Sourdough is also very forgiving, so if you forget to refresh, just resume as if you hadn't.
You can even dry the mixture to revive later on!
Sourdough
Once you have enough mature starter, you can go ahead and make your dough.
If you can, try and feed your leaven 12 h before you make the dough - to ensure it's really active.
🍞 Sourdough
- 360 g Sourdough Starter
- 900 g Strong Flour + some for dusting
- 1.05 pt Water - lukewarm
- 20 g Salt
- In a large mixing bowl, combine the 900 g flour, 360 g sourdough starter, and 1.05 pt warm water.
Mix by hand, until the dough is homogenous, and comes together. - Cover the bowl to prevent moisture loss, and leave for 30 m at room temperature to rest
Now's a good time to start working on the sauce 😊 - Place the dough on a floured worktop, and sprinkle over the 20 g salt
- Work the dough for 5 m - stretching it to develop the gluten fibres. This is what will give your dough its 'stretch', and allow it to be spread thinly
- Return the dough to the bowl, cover, and refrigerate overnight
Sauce
Store bought passata is often really watery, and without a pizza oven, this extra liquid will just sink into the dough turning it to mush.
To combat this, I add in chopped tomatoes - where plenty of water is still locked into the tomatoes and also drain both the ingredients. This removes excess water without losing any of the tomatoey richness.
Save some of the plain passata, to taste the difference before and after.
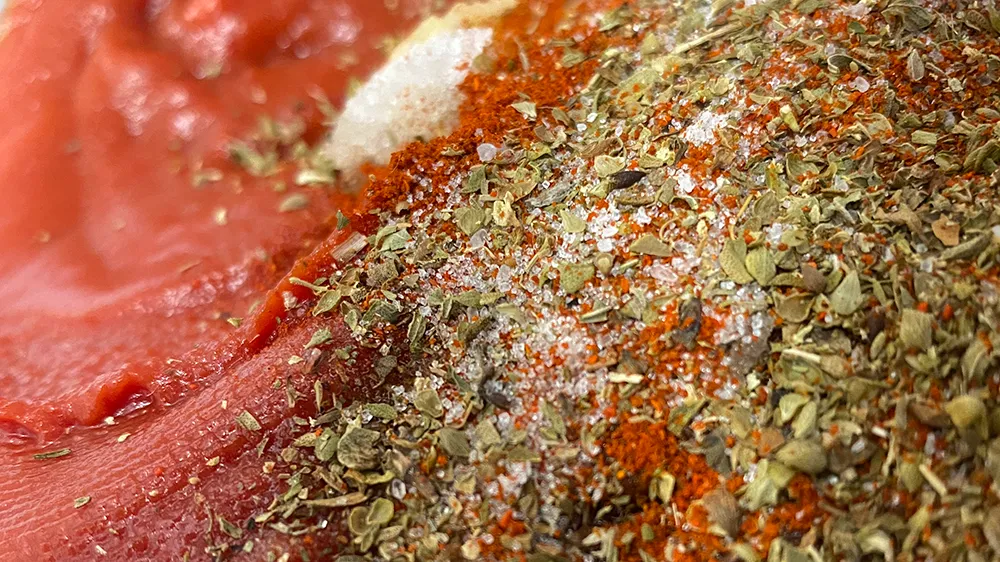
🍅 Sauce
- 500 g Passata
- 400 g Chopped Tomatoes
- 1 Tbsp Smoked Paprika
- 1 Tbsp Dried Oregano
- 2 Tsp Sugar
- 1 Tsp Salt
- 2 Garlic Cloves
- Seat a large sieve on the rim of a bowl, pour in the 400 g chopped tomatoes, followed by the 500 g passata
- Allow to drain undisturbed for 1 h to 1 h 30 m , until a substantial amount of liquid has collected: the aim being to remove as much water as possible, leaving us with a thicker, richer sauce
- Discard (or drink) the extracted liquid, and tip the contents of the sieve into the bowl
- Add the 1 Tbsp smoked paprika, 1 Tbsp dried oregano, 2 Tsp sugar, 1 Tsp salt, and 2 cloves minced garlic
- Mix well, and leave to rest. For best results, leave refrigerated overnight, allowing the flavours to diffuse
Cooking
Now that everything's ready, cooking the pizza is pretty simple. The best way of cooking pizza is in a pizza oven at >450 °C , with a stone base. This delivers a massive amount of heat to both the bottom and top of the pizza simultaneously.
I don't have a pizza oven, and you probably don't either. Turns out, it's no biggy.
We're going to recreate the conditions of a pizza oven using a frying pan, and oven grill, to heat the bottom and top of the pizza respectively. Heating from the bottom crisps the base, and the slightly gentler heat gives a really good rise. A red hot grill element easily reaches pizza oven temperatures, and will cook the toppings and char the crust.
To get a really intense heat we'll place the pizzas as close to the element as physically possible - so it's a good idea to sort the oven racks out, and check you can remove and insert the pizzas whilst cold.
Most ovens don't measure the grill temperature directly. Instead their thermostat is set off the air temperature somewhere inside the oven.
If your oven allows the grill to be powered whilst the door is open, we can use this to our advantage by keeping the door at 45 ° ish, preventing the air temperature from reaching the maximum, and the thermostat cutting the power.
If your oven doesn't allow this, then you can leave the oven door open once the pizza comes out, and allow the thermostat to yield before the next goes in.
In essence, we're trying to keep the grill red hot - cooking our pizzas as quickly as possible.
If you've found out that your oven door needs to be closed to activate the grill element, and you don't like the taste of plastic decomposition products, you'll also want to remove the handle of your frying pan. Similarly, you might want to be careful using PTFE coated pans, but to be honest I've never noticed any visible degradation.
🍕 Pizza
- Remove the dough from the fridge 3 h before you need it. (the dough may not have noticibly risen yet, but after the 3 h at room temperature it should have)
- Configure your oven racks to allow your pan to sit as close to the grill element as possible - while being easy to remove.
- Preheat the grill to its maximum setting
- Partition the dough into 6
- Stretch the dough from the centre to the edge, until the dough is translucent and covers the pan you'll be using
- Place your pan on the stove, and heat up on full.
- Carefully lay the stretched base into the pan (don't worry if the edges don't quite fit - any bunching or folding will contribute to the crust)
- Spread passata over the base, leaving a 1 " clear zone around the edge - for the crust to form
- Add your chosen toppings
- Once the underside of the pizza has developed darker brown spots, transfer the pan to the grill
- Cook for approximately 2 m , checking after 1 m , and every 30 s thereafter.
- Serve with a scattering of fresh basil leaves, and enjoy!

📷
Tomatoes by Mockup Graphics on Unsplash
Basil by Jeremy Zero on Unsplash